


The "How To" Post
Okay, the first thing you want to do is save your model image onto your computer. Next, you can go ahead an open it with pretty much any type of image software. Now, you're going to need to print your model. The easiest way to do this is to right click on the image and click print or hit CTRL+P.
Note: remember what program you are in when you print your sheet! If you want to make more models in the future, the only way they will all be the same size is if you print them the same way!
Regarding paper, I recommend cardstock because it's a lot more solid than computer paper while still being easy to bend (SEE IMAGE 1 IN SLIDESHOW). Cardstock is ideal but you can use pretty much any type of paper as long as it's in a uniform color.
Materials (IMAGE 2):
All you need is a pair of scissors and some glue. Get a glue stick because liquid glue is extremely messy. The exacto-knife isn't necessary but it helps clean things up.
The Stand:
Okay here are the instructions for making the stand. Remember, the stand really isn't necessary. You will need two copies of Stand Part A, Stand Part B, and Stand Part C. These can be found here.
First, you want to take Stand Part A and cut around it's border. Make sure you cut the little triangles labeled C that are on the inside of the border as well (IMAGE 3). Once everything is cut (IMAGE 4), go ahead and fold along the lines the same way I did in the image (IMAGE 5). You should be able to figure out how things go together at this point so just glue the corners and you have Part A covered (IMAGE 6). Next, go ahead and cut out Stand Part B. This piece is a lot simpler than Part A but just to make sure, check out the images (IMAGES 7 & 8). Once you have both parts A and B done, all you have to do is fit one into the other and glue the edges together (IMAGE 9). And voila! You're on your way to completion (IMAGE 10).
Remember, you need 2 copies of the above construction so go ahead and repeat these steps until you have two parts to the stand (IMAGE 11).
Part C is the easiest it gets. Cut out the two copies you printed (IMAGE 12) and fold them as seen in the image (IMAGE 13). Then, simply glue the two pieces together to form a column (IMAGE 14). No more gluing is required at this point, just put the column in between the two bases (IMAGE 15). That's it. You have a completed stand.
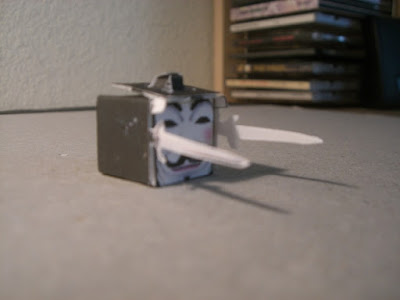
The Cubes:
The cubes are real simple. First, cut your cube out (IMAGE 16) with the triangles on the edges cut the same way as (IMAGE 17). Fold along the lines inwards so your cube looks like (IMAGE 18). Then, glue the tab at the very end to the back of your character's face (IMAGE 19). Glue the tabs on the right and left (IMAGE 20) and your cube is complete!
I went and made my first two (IMAGE 21) and they fit perfectly into my stand (IMAGE 22).


Default Cube
Here is the default design for the cubes I am going to create. Feel free to create your own with this template as long as I get credited by some means.

Download it here.

Download it here.
JPG/BMP Issue
Okay, I realized that jpeg format could possibly screw up the images when uploaded so, from now on, all images will be in bitmap form. This wasn't an issue for the stand model but it will become a problem with the cubes. That is all, problem fixed :)
The Stand
Here is the basic layout of the stand that will hold my 80 cubes.
This is the most confusing of all models that I will ever upload to this site so don't worry. It will only get easier from here.
Unless you plan on making 80 cubes as well, I don't recommend constructing this. You never know, so I'll post it below and eventually add pictures of the procedure to make it.
Stand Part A - You'll need two of these. They attach to Parts B.
Stand Part B - You'll need two of these. They attach to Parts A.
Stand Part C - You'll need two of these. These two pieces fit together to create a simple column.
And that's it. Click here for instructions on how to build this as well as pictures to help you through the steps.
Contact Me
If you have any questions or comments, feel free to email me.
Or reach me at my AIM account.
I am open to any ideas or requests so please let me know if you have some.
Or reach me at my AIM account.
I am open to any ideas or requests so please let me know if you have some.
Welcome
Hi there, this is Kata124 posting. I hope this is worth your time. Basically, I've been into papercraft for a while and decided I might as well create a blog about my works. I didn't want this blog to be another papercraft fan page, though, so I decided to set a goal and stick to it. My initial concept was to create a set of 100 different cubic characters that represented all of my interests. I then thought about how such concepts had already been done and decided to diversify my project a tiny bit by forming a larger cube through the construction of these smaller cube characters. Ideas became a reality and I started plotting out the dimensions for my 'Cube of Life' (which turned out to fit 80 cubes instead of 100). All that's left to do now is actually start the project. My plan is to keep all you readers informed on how everything is going and post printouts so you can create your own characters. Hope this all goes as planned. If it does, it's going to turn out to be an awesome work of art.
Subscribe to:
Comments (Atom)
